通过 PicGo 已有配置(PicGo Cloud、GitHub、S3、腾讯云 COS、七牛,或任意已安装的上传插件)把本地图片和文件上传到图床,提供 `picgo_upload` 工具与 `/picgo` 命令。
安装
# npm 包(预构建)
dsh plugin --profile web add @picgo/dsh-plugin
# GitHub 源码(首次需按提示配置 allowBuilds 构建授权后重试)
dsh plugin --profile web add github:PicGo/dsh-plugin
装任何插件都等于在你的机器上跑第三方代码,权限和你本人一样大——能读你的文件、用你的凭据、访问网络,工具审批管不到它。GitHub 来源的插件还会在安装时执行构建脚本——pnpm 默认拦截,所以安装可能停在 ERR_PNPM_GIT_DEP_PREPARE_NOT_ALLOWED 或 ERR_PNPM_IGNORED_BUILDS;dsh 会打印出需要添加的确切键名,把它加进该 profile 的 pnpm-workspace.yaml 的 allowBuilds 下,重跑一次即可装上。放行构建本身就是一次信任判断:请只安装可信来源,并尽量锁定 commit(github:owner/repo#sha)。
README
该插件的 README 只有英文版本。
Upload images and files to your image host from DeepSeek Harness, powered by PicGo.
Harness can show your agent a screenshot, but it has no way to turn a local file into a link. So when the agent writes a README, renders a chart, or captures a screenshot, the image stays on disk and  becomes a dead link the moment you push. This plugin closes that gap.
It uploads through whatever image host you already configured in PicGo — PicGo Cloud, GitHub, S3, Tencent COS, Qiniu, or any third-party uploader plugin you installed. Nothing to re-configure. If you've never used PicGo, it walks you into PicGo Cloud's free tier.
If the PicGo desktop app is running, uploads go through it, reusing the image host you set up in its window. Otherwise they run in-process. See Upload routes.
Install
dsh plugin --profile web add @picgo/dsh-plugin
Then boot as usual:
dsh --profile web
What you get
picgo_upload — a tool the model calls on its own when a local file needs to become a link. Returns structured results, so in Code Mode you can use it directly:
const { uploaded } = await tools.picgo_upload({ paths: ['/tmp/chart.png'] })
console.log(uploaded[0].imgUrl)
/picgo — a command that uploads without spending a model turn:
| Command | What it does |
|---|---|
/picgo |
Upload the clipboard image |
/picgo <path>... |
Upload one or more files |
/picgo status |
Show the active host and sign-in state |
/picgo login [token] |
Sign in to PicGo Cloud |
/picgo logout |
Sign out |
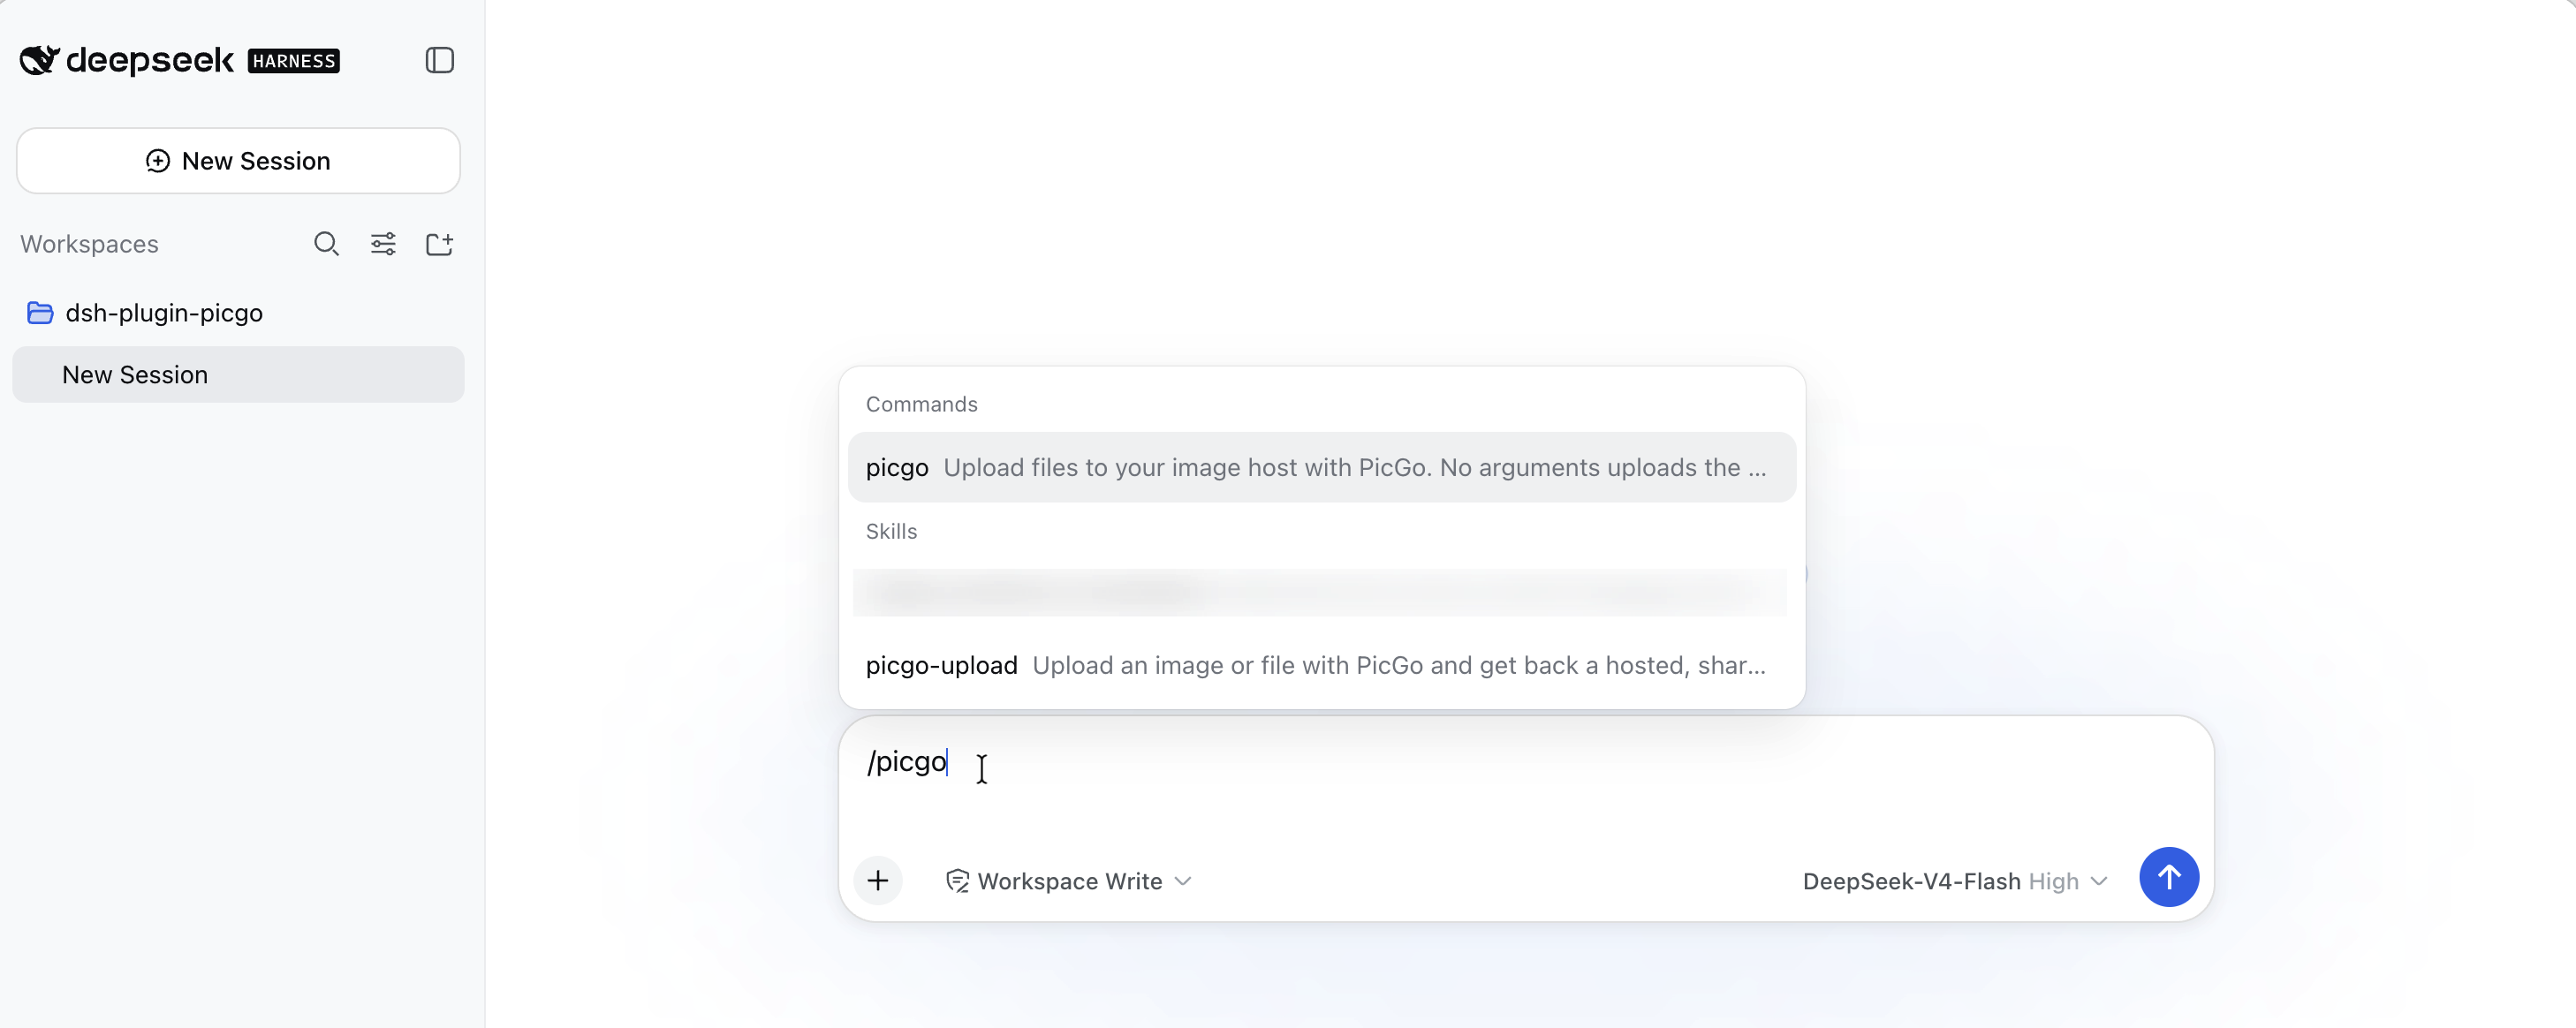
A bundled skill that teaches the model when to upload — inserting a screenshot into docs is the primary case — and when not to (you named a specific destination, you want a local copy).
Upload routes
There are two ways this plugin can reach your image host, and it picks one per upload:
- The PicGo desktop app, when it is running. It exposes a local upload server, and using it means your uploads honour the host you configured in the app's window.
- In-process PicGo, otherwise — the
picgolibrary reading~/.picgo/config.json.
This matters because the two read different config files. The desktop app stores its settings in the system application-data directory (on macOS ~/Library/Application Support/picgo/data.json), while the library reads ~/.picgo/config.json. If you have only ever used the GUI, the library route sees a config you never touched — most likely empty and defaulting to PicGo Cloud. Preferring the app is what makes "it just uses my existing setup" true.
Upgrading from 0.1.x? If the desktop app is running and the two configs point at different hosts, your uploads will now land on the app's host rather than the CLI's. Set
gui.mode: offto keep the old behaviour.
/picgo status tells you which route is active. Two things worth knowing about the desktop-app route:
- The app copies each URL to your clipboard and shows a notification — that is the app's own behaviour and this plugin cannot turn it off.
- If an upload there fails with a login error, sign in from the app's own window.
/picgo loginwrites the PicGo CLI config, which the desktop app does not read.
First run
If you've never configured PicGo, uploads default to PicGo Cloud, which needs a one-time sign-in. The free tier covers casual use.
/picgo login
That opens your browser and reports back when it completes. If you already have a token from the PicGo Cloud dashboard, /picgo login <token> is instant.
The model will never run this for you: with no token the sign-in blocks waiting on a browser callback, which would hang the session. It relays the instruction and waits.
Already using GitHub, S3, or another host in PicGo? None of this applies — your existing config is used as-is and no sign-in is involved.
Configuration
Every field has a working default. Override them from your profile's cordis.patch.yml:
- id: picgo
  name: '@picgo/dsh-plugin'
  config:
    silent: true
    timeoutMs: 120000
| Field | Default | Meaning |
|---|---|---|
configPath |
'' |
PicGo config file; empty uses PicGo's own default (~/.picgo/config.json) |
silent |
true |
Suppress PicGo's console output and its picgo.log writes |
timeoutMs |
120000 |
How long to wait for one upload |
registerSkill |
true |
Register the bundled picgo-upload skill |
registerCommand |
true |
Register the /picgo command |
announceSignIn |
true |
On startup, point a signed-out PicGo Cloud user at /picgo login |
gui |
see below | How to reach a running PicGo desktop app |
gui controls the desktop-app route described in Upload routes:
| Field | Default | Meaning |
|---|---|---|
gui.mode |
auto |
auto uses the app when it answers; off never tries; only requires it rather than uploading to a different host |
gui.host |
127.0.0.1 |
Where the app's upload server listens |
gui.port |
36677 |
" |
gui.secret |
'' |
Auth secret, if you enabled one in the app. Empty falls back to $PICGO_SERVER_SECRET |
gui.probeTimeoutMs |
1500 |
How long to wait for the app to answer a heartbeat |
gui.probeTtlMs |
5000 |
How long a heartbeat result is reused, so a multi-file upload does not re-probe per file |
gui.timeoutMs |
0 |
Upload deadline for this route; 0 inherits timeoutMs |
A patch replaces a row's entire config rather than merging keys, so restate every field you want to keep. Within gui, unset keys still fall back to the defaults above — overriding gui.mode alone is fine.
Notes
Uploaded links are public. Anyone with the URL can open it, and a deleted file may stay cached. Fine for screenshots and doc images; think before uploading a contract PDF or an internal archive. The bundled skill tells the model to confirm first for anything that looks sensitive.
Your PicGo config is treated as read-only, with one exception outside this plugin's control: when PicGo Cloud rejects a stored token, PicGo itself clears it from ~/.picgo/config.json. Signing in and out through /picgo login / /picgo logout also writes the token, as you'd expect.
Clipboard uploads need a desktop session and are only reachable through /picgo — the model is never given a way to upload your clipboard, since it can't know what's on it.
Falling back to the in-process route is deliberately narrow. If the desktop app stops between the check and the upload, the upload is retried in-process. But a rejected upload, a missing auth secret, or a timeout is reported rather than retried elsewhere: the app may have already accepted the file, and silently re-uploading would put a second copy on a host you did not pick.
If an upload through the app hangs, check whether "rename before upload" is enabled in its settings — that opens a dialog and waits for a human, which nothing is going to answer in an agent session. The timeout message says so too.
Development
pnpm install
pnpm build
pnpm test
pnpm test:live additionally exercises the desktop-app route against a running PicGo app. It is kept out of pnpm test because it uploads real files to your real image host.
To run it against a dsh source checkout without packaging, write a cordis.dev.yml (gitignored — the path is specific to your machine):
- insert:
    - id: picgo
      name: '/absolute/path/to/dsh-plugin/lib/index.js'
Then, from the dsh checkout:
pnpm dsh web --patch /absolute/path/to/dsh-plugin/cordis.dev.yml
The path must be absolute: a patch adds config but does not move the loader's resolution root.
Releasing
@picgo/bump-version bumps the version, writes the changelog, commits, and tags in one step:
pnpm release          # patch: 0.1.0 -> 0.1.1
pnpm release:minor    # 0.1.0 -> 0.2.0
pnpm release:major    # 0.1.0 -> 1.0.0
pnpm release:beta     # 0.1.0 -> 0.1.1-beta.0
pnpm release:dry      # print what would happen, change nothing
Then push the tag — that is what triggers publishing:
pnpm push-release
The release workflow runs typecheck, tests, and build before publishing, and refuses to publish if the tag does not match package.json. Prerelease tags pick their own dist-tag (-beta.x → beta, -alpha.x → alpha, anything else prerelease → next), so npm install @picgo/dsh-plugin never resolves to a prerelease.
npm authentication
npm cannot configure a trusted publisher for a package that does not exist yet, so the first release and every later one authenticate differently.
First release — needs an NPM_TOKEN repository secret (a granular token with publish rights to the @picgo scope):
gh secret set NPM_TOKEN --repo PicGo/dsh-plugin
After that first release lands, switch to trusted publishing so no long-lived token is involved. On npmjs.com, open the package → Settings → Trusted Publisher, and register:
| Field | Value |
|---|---|
| Publisher | GitHub Actions |
| Organization or user | PicGo |
| Repository | dsh-plugin |
| Workflow filename | release.yml (filename only, not a path) |
| Environment name | leave empty |
| Allowed actions | npm publish |
The workflow already sets id-token: write, so nothing changes on this side — npm picks OIDC over the token automatically. Once a trusted-publish release succeeds, delete the NPM_TOKEN secret and revoke the token, then set Settings → Publishing access to "Require two-factor authentication and disallow tokens".
Trusted publishing needs npm ≥ 11.5.1, so the release workflow runs on Node 24 (which ships npm 11.x). Node 22 ships npm 10.x and fails with a misleading 404. That choice affects only the machine doing the publishing — the package itself still supports Node ^22.19.0 || >=24.0.0, and CI tests against 22.
Compatibility
Tested against DeepSeek Harness 0.1.1-rc.2 (2026-08-22) and PicGo Core 3.0.1. Requires Node ^22.19.0 || >=24.0.0.
The desktop-app route needs a PicGo app new enough to expose the local upload server. If yours is older, gui.mode: auto simply never finds it and everything runs in-process as before.
Harness is a developer preview and its APIs change often. If a release breaks this plugin, please open an issue.
License
MIT
链接
同类插件
Tencent/WeKnora#dsh-weknora★ 30675
把 WeKnora 知识库接入 dsh 的四个只读工具:列出知识库、混合检索原文片段、按顺序还原单篇文档,以及直接取用 WeKnora 自己带引用的 RAG 或 ReAct agent 回答(含可续聊的 session id)。
superdesigndev/treg★ 3596
给 Agent 的工具目录:按「要做的事」检索约 2,600 个外部接口(SEO 与 SERP、外链、社交、人物与公司信息补全、广告库、抓取),查看参数与单次调用价格后直接调用,凭据由服务端注入。附带技能,MCP 行在未设置 TREG_TOKEN 前保持禁用。
TencentCloudBase/CloudBase-AI-Toolkit#dsh-plugin★ 1126
把腾讯云 CloudBase 后端接入 DeepSeek Harness——在对话里搭好并部署全栈应用,查询结果渲染为表格卡片(分页、排序、导出 CSV),部署后可预览真实域名,并提供 CloudBase MCP 工具集(`mcp__cloudbase__*`),登录走 device-code 流程。
gitroomhq/postiz-agent#dsh-postiz★ 496
通过 MCP 将 DeepSeek Harness 连接到 Postiz:列出已连接的社交媒体渠道、获取各平台发帖规则,并向 X、LinkedIn、Instagram、Facebook、Threads、TikTok、YouTube、Reddit、Bluesky、Mastodon、Discord、Slack、Telegram 等平台排期、存草稿或发布帖子;附带 postiz 工作流技能。
EthanYoQ/Invoice-Downloader#dsh-invoice-downloader★ 446
面向 DeepSeek Harness 的本地 IMAP 发票下载、OCR 识别、归档与 Excel 报销汇总。
anysearch-team/anysearch-dsh★ 430
基于 AnySearch 的实时网页与垂直搜索插件,为 DeepSeek Harness 提供搜索工具。
社区评论
评论公开保存在 GitHub Discussions。加载评论会连接 GitHub 和 Giscus;发表内容需要 GitHub 账号。