Looks, acts and looks again in one tool call: real mouse and keyboard input with an annotated before and after frame, aimed with 0..1 screen coordinates across monitors, and it hides the dsh-see-now floating window when a click would land on it.
Install
# from GitHub (first run asks for allowBuilds approval — follow the hint, retry)
dsh plugin --profile web add github:cloudylapis/dsh-see-act
Any plugin you install runs third-party code with your own permissions — it can read your files, use your credentials, and reach the network, and tool approvals don’t sandbox it. GitHub-sourced plugins also run build scripts at install time — pnpm blocks those until you allow them, so an install can stop with ERR_PNPM_GIT_DEP_PREPARE_NOT_ALLOWED or ERR_PNPM_IGNORED_BUILDS; dsh prints the exact key to add under allowBuilds in your profile’s pnpm-workspace.yaml, and the install works on the next run. Allowing a build is a trust decision: only install sources you trust, and pin a commit (github:owner/repo#sha).
README
This plugin publishes its README in Chinese only.
给 dsh-see-now 的实时视野配一双手。
see_now 能一直看着屏幕,但它的参数里没有坐标、没有点击、没有键盘——所以在
"边看边点"这件事上它只能看。real_*(dsh-plugin-real-input)能点,但每次动作都是一次
独立的截图 + 一次独立的光标操作,模型得来回三四趟才能确认一个按钮到底点没点中。
see-act 把这两件事合成一次调用:
一次 see_act  =  截 before(带网格 + 准星) → 真的移动鼠标 / 打字 → 截 after(带准星 + 3× 放大插图)
                 整个过程在同一个 PowerShell 进程里,返回两张图和一句结论
模型因此从"截图 → 看图 → 点击 → 截图 → 看图 → 判断"的 3 轮往返,变成 1 轮;
changed=0 这类结论直接写在文字里,下一次调用还能读到(图片会被压缩掉,文字不会)。
它解决的具体问题
| 问题 | 传统做法 | see-act |
|---|---|---|
| 点完不知道点中没有 | 再截一张图自己看 | 同一次调用返回 after 帧 + 4.2% changed(或 no change) |
| 像素坐标算不准 | 从缩放过的图上数像素,DPR 一错就全错 | 用 nx/ny(0..1)瞄准,也可以给 cell:"3,7",物理像素由插件自己算 |
| 小字看不清 | 再截一张放大图 | see_zoom 或 after 帧里自带的 3× 插图 |
| 多块屏 | 猜是哪一块 | screen:"foreground"(默认,跟当前前台窗口走)/ primary / cursor / all / 序号 |
| 浮窗挡着目标 | 点下去点到浮窗上 | 检测 see-now 浮窗矩形,需要时临时隐藏、点完恢复,并在图上报出这件事 |
| 一次要多步 | 五六次工具调用 | steps:[…] 一次最多 8 步(点输入框 → 打中文 → 回车 → 等) |
四个工具
| 工具 | 干什么 | 典型耗时(本机 2560×1600 + 1920×1080) |
|---|---|---|
see_look |
立刻截一张带网格/准星/浮窗框/3× 插图的图,不阻塞 | ~1.7s |
see_zoom |
把一个点周围 1:1 的像素放大 2–4 倍,用来读小字 | ~1.3s |
see_act |
真的点击/拖动/滚动/打字/按键/等待/切窗口,返回 before+after | ~2.3s(含 200ms 等待、两张图、插图) |
see_stop |
刹车:stop 写一个旗标让下一次 see_act 拒绝动手,clear 解除,status 报当前状态 |
<0.1s(status 要探屏,约 1s) |
see_act 的 do 取值:click、double、right、middle、move、scroll、drag、type、key、wait、focus。
长什么样
真机跑 node test/accept-real.mjs 得到的两帧(聚焦记事本 → 打一行中文):
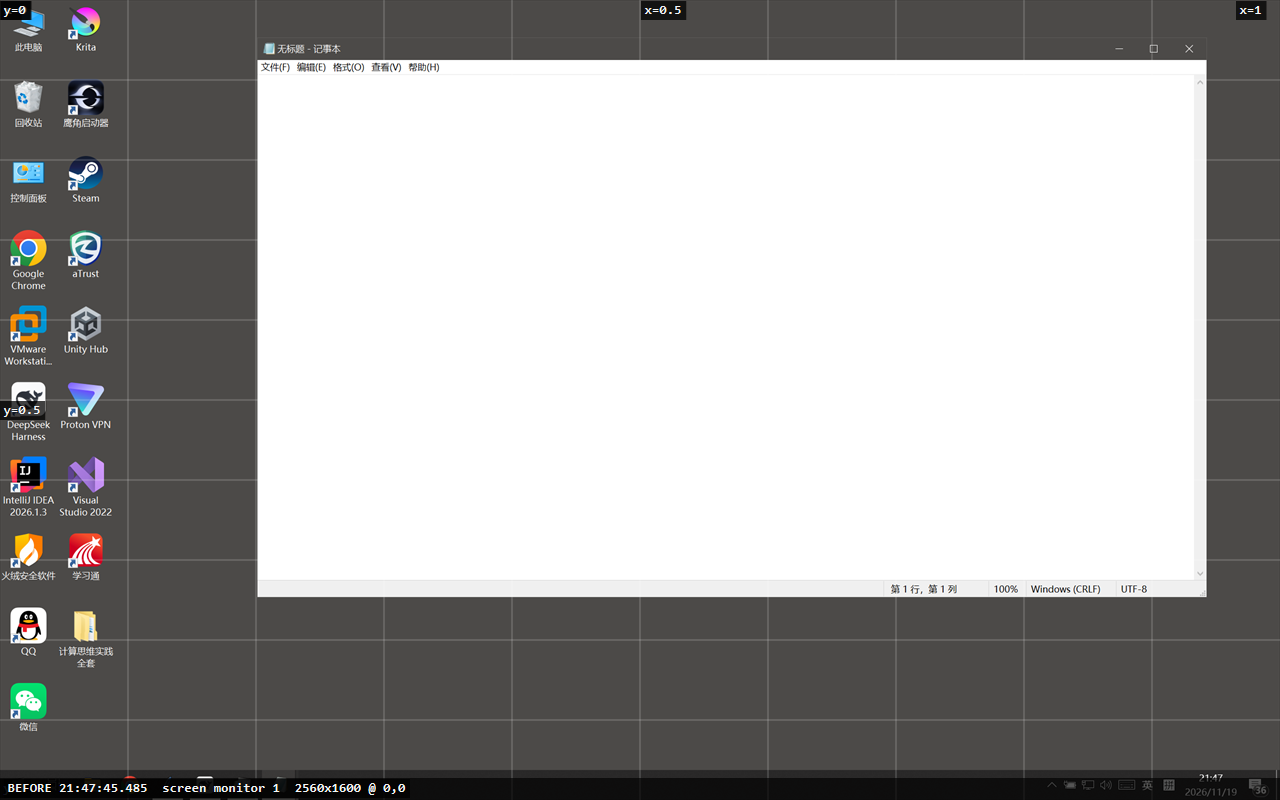
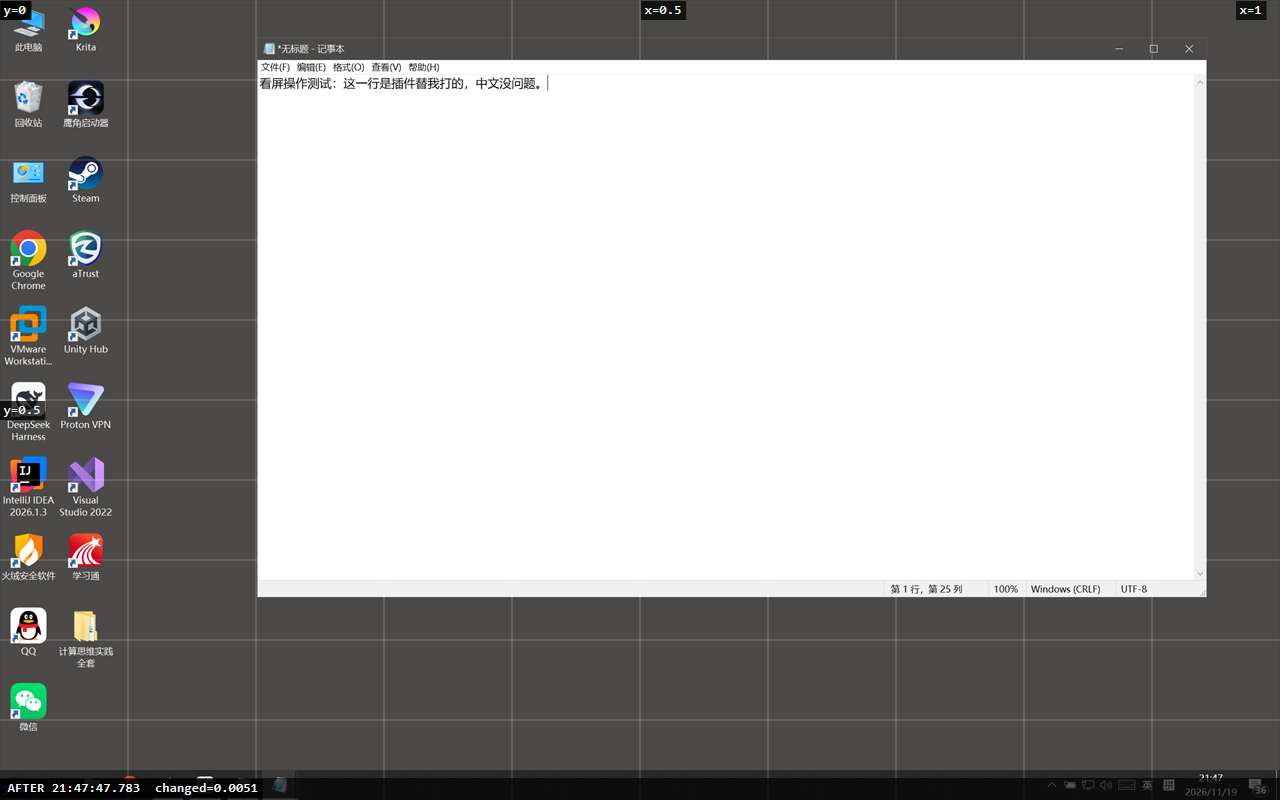
before 帧回答"我要点哪里",after 帧回答"点完之后屏幕变成什么样"。两张图都带 0.1 网格和
x=/y= 标签,after 帧右下角的 3× 插图是准星周围 1:1 的放大,用来确认准星是不是真的压在了
目标上。
坐标契约
默认用 nx/ny(帧的比例,0 是左/上,1 是右/下)。理由很实际:模型看到的图是缩放过的
(1280×720 或 800×450),在上面数像素迟早差几十个像素。比例不受缩放影响。
也接受:
{ "x": 1204, "y": 860 }—— 物理屏幕像素(多屏时是虚拟桌面坐标,见下);{ "cell": "3,7" }—— 图上 0.1 网格的第 4 行第 8 格中心,给"就在那一格"的场景用。
返回的每一帧文字里都写着 monitor 2 1920x1080 @ 2560,145 · image 1280x720 · 1 image px = 1.50 screen px,
以及 done x=2982 y=447 这样的物理坐标,下一次可以直接复用。
安装
它和 dsh-see-now、dsh-plugin-real-input 都是普通 bundle 插件,可以同时装着、互不干扰。
从市场装:DSH → 插件 → 插件市场 → 搜「看屏操作」→ 安装。
手动装(等价):
& "$env:LOCALAPPDATA\Programs\DeepSeek Harness\resources\runtime\cli\bin\dsh.cmd" `
    plugin --profile desktop add github:cloudylapis/dsh-see-act
或者把仓库 clone 下来,用 插件 → Add plugin 选那个目录(pnpm 会把依赖和
dsh.profile.bundles 一起写好)。
装完重启 DSH、开一个新会话再验证:旧会话的工具表不会热更新。
改完代码怎么生效:不用重启,让宿主重新 apply 这个插件即可(plugin_manager 的
set_plugin,target 要用完整 entryId include:dsh-see-act,用包名会回 unknown-plugin)。
如果工具干脆没出现,先看 list_plugins 里这条的 fiberPhase / diagnostic——
fiberPhase:"failed" 说明整个插件没挂上(四个工具全没有),原因通常是 schema 不合法,
见 docs/DETAIL.md 的「宿主校验」一节。改文件本身不会热重载失败的 fiber。
手动验证(不经过模型):
$env:Path = "$env:USERPROFILE\.dsh\dsh-runtimes\dsh-primary-runtime\dependencies\node\bin;" + $env:Path
cd <这个目录>
node test/e2e-tools.mjs      # 真的会移动鼠标,跑完会解除 stop 旗标
node test/smoke.mjs          # 只截图/标注/等待,不点击
安全默认
- 每次动作前都检查
~/.dsh/see-act.stop;see_stop({action:"stop"})一写,下一次see_act直接拒绝, 直到see_stop({action:"clear"})。旗标是文件,跨会话、跨进程都有效。 - 危险组合键默认拒绝:
Win、Win+R/X/L/D/E/Tab、Ctrl+Alt+Del、Ctrl+Shift+Esc、Alt+F4、Alt+Tab。 确实需要时传force:true,并且应当先跟用户确认过。 - 单次最多 8 步、估算总时长超过 60s 的计划直接拒绝;
type最多 4000 字符。 mode:"readonly"只留see_look/see_zoom/see_stop。- 动作落点如果落在 see-now 浮窗里,默认先隐藏它再点、点完恢复(
dodge:"hide");也可以用dodge:"off"让它老老实实报"这一下会点到浮窗上"。 - 每一步都会写一行旁白到 see-now 的聊天流(
~/.dsh/see-now/chat.jsonl),用户能在浮窗里看到 插件刚刚动了哪里;say参数则走语音通道。
和 see-now、real-input 的关系
- 不改 see-now 一行代码。它没有导出活着的采集器,所以 see-act 自己抓图(GDI,DPI-aware),
只在可选的地方借用它的库:聊天流(
dsh-see-now/chat)、浮窗 pid(dsh-see-now/window的pidPath(),或直接读~/.dsh/see-now-window.pid)。 see_now仍然负责"持续看";see_act负责"看+动一次";两个工具在一个会话里可以轮流用。- 和
real_*不共享状态,各自 spawn 自己的 PowerShell。两者同时动手会互相打断,别这么用。 - 想让
see_act的 before 帧里认出浮窗,装 see-now 即可;浮窗没开时图上就没有红框,一切照常。
和 see-now 0.2.x 一起用时要知道的三件事
浮窗默认不在截图里。see-now 0.2 起给浮窗设了
WDA_EXCLUDEFROMCAPTURE:截图、录屏、 屏幕共享都拍不到它(GDI、BitBlt、PrintWindow、ffmpeg/ddagrab 一律拍不到 —— 这不是窗坏了, 是它故意的)。所以see_act的帧里默认看不到浮窗,只能看到我们画的红框。 想让它出现在帧里(模型能看见自己正踩在什么上):~/.dsh/watch-window.json写{"capturable": true},重开浮窗。分享屏幕时记得改回false。浮窗要一个带
tkinter且装了mss/pillow/numpy的 python。本机 PATH 上没有 python, 能用的是 DSH 自带的那个;0.2.x 不会自己去找它(pythonCandidates()只认DSH_SEE_PYTHON、~/.dsh/see-window.json的python、以及 PATH 上的python(w).exe)。本机已经这样配好:~/.dsh/see-window.json {"python": "C:\\Users\\Administrator\\.dsh\\dsh-runtimes\\dsh-primary-runtime\\dependencies\\python\\python.exe"}那个 python 里已经
pip install mss(10.2.0)。缺包时 0.2.5 会弹 MessageBox 并写~/.dsh/watch-window-error.log(旧版是静默退出)。避让是按窗口矩形算的,不依赖能不能拍到像素。浮窗藏在截图外时这条尤其重要:
see_act用 pid +FindWindowByPid拿矩形、判断落点、必要时ShowWindow(0)藏起来再点, 点完先恢复、再拍 after 帧(否则模型下一轮会以为窗口凭空消失了)。
配置
~/.dsh/see-act.json(可选,全部有默认值):
{
  "mode": "act",              // act | readonly
  "quality": "aim",           // fast 800 / aim 1280 / read 1600
  "screen": "foreground",     // foreground | primary | cursor | all | 序号
  "settleMs": 140,            // 每步后等多久再截 after
  "shots": "both",            // both | after | none
  "zoomInset": true,          // after 帧右下角的 3× 插图
  "dodge": "hide",            // hide | off
  "narrate": true,            // 往 see-now 聊天流写旁白
  "captureFallback": true,    // GDI 拍到全黑时用 ffmpeg/ddagrab 重抓一次
  "maxSteps": 8,
  "maxPlanMs": 60000
}
环境变量覆盖(优先级更高):DSH_SEE_ACT_MODE、DSH_SEE_ACT_QUALITY、DSH_SEE_ACT_SCREEN、
DSH_SEE_ACT_SETTLE_MS、DSH_SEE_ACT_NARRATE、DSH_SEE_ACT_NO_DODGE、DSH_SEE_ACT_CONFIG、
DSH_SEE_ACT_FRAMES、DSH_SEE_ACT_STOP。
已知边界
- 只用 Windows(P/Invoke + PowerShell 5.1 + System.Drawing),
os: ["win32"]。 - GDI 抓不到硬件叠层(部分视频播放器、受保护内容);这时会自动退回 ffmpeg 的
ddagrab(只覆盖主屏、无标注),并在文字里说明。 - 输入走 SendInput:普通 Win32/WPF/UWP 应用都行;少数全屏游戏/反作弊程序会忽略合成输入。
- 一次最多 8 步;超过 3 步时 before/after 只反映首尾(文字里会提醒)。
- 浮窗避让依赖它的窗口矩形,不依赖它是否真的画出了像素。
更多实现细节见 docs/DETAIL.md。
开发
node --test "test/*.test.mjs"   # 纯逻辑单测(几何/步骤/配置/旗标/工具形状),不碰屏幕
node test/e2e-tools.mjs          # 端到端:真的截图、移动鼠标、arm/clear 刹车
node test/smoke.mjs              # PowerShell 层:probe/look/zoom/act 四种动作
node test/accept-real.mjs        # 真机验收:打开记事本 → 聚焦 → 打中文 → 存两张帧到 %TEMP%\see-act-accept
MIT。见 NOTICE。
Links
More in this category
Tencent/WeKnora#dsh-weknora★ 37918
Four read-only tools over a WeKnora knowledge base: list knowledge bases, hybrid passage search, reassemble one document's chunks in order, and WeKnora's own cited RAG or ReAct-agent answer with a resumable session id.
DayuanJiang/next-ai-draw-io#dsh-plugin★ 37097
Draws draw.io diagrams in DeepSeek Harness through the next-ai-drawio MCP server: the link in the reply opens a live preview in the right sidebar, you can edit the diagram by hand, and each AI change is a version you can restore. Node.js 18+; npx downloads the MCP server on first use.
superdesigndev/treg★ 8650
Tool catalog for agents: search ~2,600 external endpoints (SEO and SERP, backlinks, social, people and company enrichment, ad libraries, scraping) by the task you want done, read each one's parameters and per-call price, then call it with the credential injected server-side. Ships the skill plus an MCP row that stays disabled until TREG_TOKEN is set.
T-Auto/dsh-ops★ 5964
Provides bash, PowerShell 7, and high-performance Rust tools for DSH on Windows to reduce token usage.
sixtysevenlf/dsh-blender-plugin★ 2216
Lets a DSH agent drive a local Blender over a direct TCP channel with 15 tools: viewport frames, custom-angle renders, Python execution, headless and job offload, transaction rollback, and a planning layer of 228 ops across 34 families.
helloHub1212/dsh-windows-mcp★ 2002
Bridges the CursorTouch/Windows-MCP desktop automation server into DSH through the official MCP client bridge, registering its screenshot, UI tree snapshot, mouse and keyboard input, clipboard, process and registry tools as mcp__windows__* tools for the model, and adds a windows_mcp_doctor diagnostic tool. Computer Use is off by default and is switched on from the plugin panel.
Community comments
Comments are public GitHub Discussions. Loading them connects to GitHub and Giscus; a GitHub account is required to post.